When people attend events, there are a lot of reasons why you might want them to check in, including Participant Engagement and utilizing Check-in Suite. PocketPlatform puts check-in right in people's, well, pockets!
To leverage check-in, you'll need scanners that can scan phone screens. While bar code scanners will work if you're not using FastPass, scanners that can read QR codes will work for both.
FastPass
 | If configured, a FastPass card displays on your user's Dashboard during check-in events. - App users will see the FastPass option if either:
- They have an Event Participant record associated with an Event that allows check-in.
OR - They have a Group Participant record in a Group that has an Event/Room assignment for an Event that allows check-in.
- When selected, users are presented with their Household check-in options so they can check in on their phone.
- When a user checks in on their phone, an Event Participant record with the Participant Type "Registered" is created.
- When the QR code is scanned, relevant name tags automatically print (if the scanner allows it) and the Participant Type is updated to "Attended".
- FastPass honors the Check-in window on the Event record, as defined by the Early Check-in and Late Check-in Periods. So if the Early Check-in Period is 30 minutes and the Late Check-in Period is 10 minutes, FastPass becomes available 30 minutes before the start of the Event and stays visible until 10 minutes after the start of the Event.
|
Configuring FastPass
Want to get FastPass up and running? We can help you! Contact Support to enable FastPass. Pro tip: Make sure you have QR code reading scanners ready to go. Once FastPass is enabled, both check-in options will present QR codes.
FastPass only displays on the Dashboard when there is a Check-In Event, so make sure of the following:
- Check-In is turned on for your Event.
- People are in Groups associated with the Event.
- The early and late check-in times are set. If FastPass isn't displaying on your Dashboard soon enough or is disappearing too early, try adjusting these times.
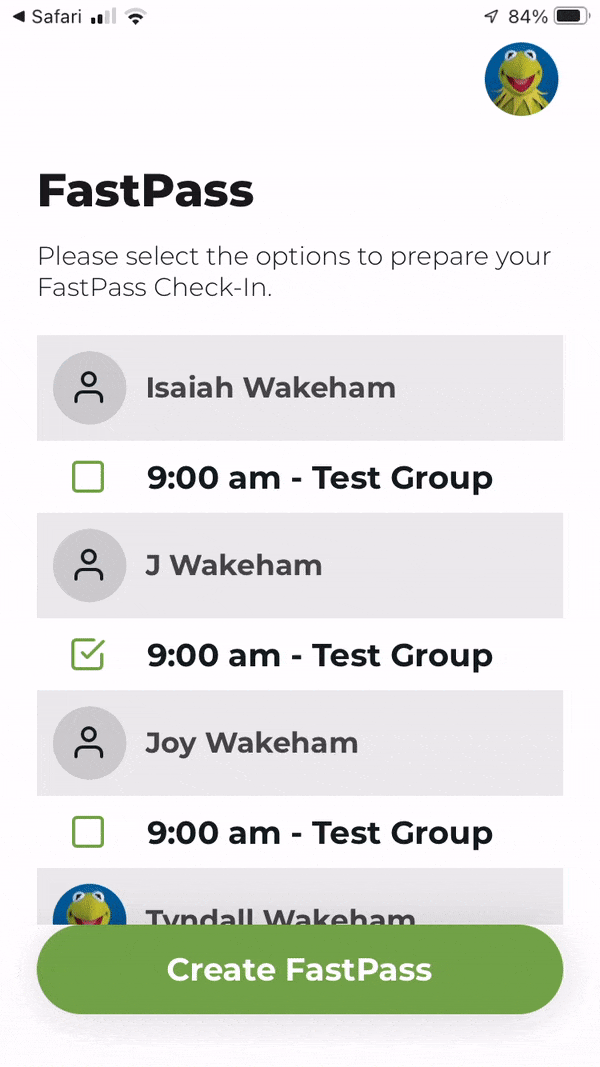
Using FastPass
By default, FastPass is available one hour before the Event starts and 10 minutes after the start time. Want different availability? No problem! Add your custom times to the Early Check-In Period and Late Check-In Period fields on the Event record.
- Open your PocketPlatform app.
- Tap the "Check-in with FastPass" option on the Dashboard.
- Select relevant check-in options.
- Tap Create FastPass.
- Scan the QR code.
- Name tags print automatically, as long as the scanner allows it and is configured to do so. For more information, see the Pre-Check (QR Code) option on Searching & Checking In.
Need to use the QR code without checking anyone else in? Use the handy dandy QR Code button in the bottom right to go back to the QR Code screen. Very helpful when a parent completed the FastPass process and then a child grabbed the phone and tapped a bunch of things and can't find the QR Code anymore!
Check-In
Note: While check-in is available, it has been superseded by FastPass.
Standard check-in presents the user with a bar or QR code that is generated based on the Family Call Number field on their Household record.
- If FastPass is enabled, check-in presents a QR code. If not, a bar code is presented.
- Check-in does not allow for pre-registration or auto-printing of badges. When scanning a barcode at a check-in station, the user is presented with their Household's check-in options.
Using Check-In
- Open your PocketPlatform app.
- Tap the Actions Menu > Check-in.
- Scan the QR or barcode.
- Select your check-in options.
- Print the badges.
Self Check-In
Self check-in, where app users can check in using their own device, is also available if you choose to link to it. This can be helpful for very large events where you don't want people waiting in long lines at check-in stations. But, it's based on the honor system, so be sure you trust your attendees to mark themselves present only if they actually attend.
Configuring Self Check-In
To allow for self check-in, you just need to link to it -- usually from a Dashboard recipe. Contact Support to get the recipe you'll need. Then, on the appropriate Event record(s), set "Allow Self Checkin" to Yes.
Using Self Check-In
App users can access self check-in from the Dashboard link you set up. Once they click the link, they can check themselves in as attending either in person or online. The head of household can check in family members as well. Once checked in, the Event Participant records are created for that event. If they marked themselves as attending online, the Attending Online field is set to Yes on their record.
